Followers:

Tuesday, 10 May 2011

Modern US Army: MH-6 and AH-6J "Little Birds" work in progress (2)

AH-6J
MH-6

Prime(r)-time.


So, today I applied the grey primer (Tamiya)...I've been using grey primer spray as I do hope the paintjob will turn out brighter later.

Tamiya NATO Black sprayed on top. Agreed, in my pics it looks just like Chaos Black primer, but in reality its way brighter, more like a dark grey.


Time to paint up some details.

Monday, 9 May 2011

Modern US Army: MH-6 (SOF transport) "Little Bird" work in progress

MH-6 with its typical benchs for the SOF guys to sit upon (crew is SHQ if I remember correctly, SOF guys are Caesar plastics - unsure if they will be added).


MH-6 side shot, note the new tail and the FLIR turret as well as the added GPS antenna.


MH-6 details: note the support struts on the bench (scratchbuilt) and the mounted (scratchbuilt) FRIES (=FastRope Insertion and Extraction System) over the rear doors.


MH-6 front.


Modern US Army: AH-6j (armed) "Little Bird" work in progress

The 160th Special Operations Aviation Regiment (Airborne) is a special operations unit of the United States Army that provides helicopter aviation support for general purpose forces and Special Operations Forces. Its missions have included attack, assault, and reconnaissance, and are usually conducted at night, at high speeds, low altitudes, and on short notice. The 160th SOAR is headquartered at Fort Campbell, Kentucky. The 160th SOAR (A) are also known as the Night Stalkers and their motto is "Night Stalkers Don't Quit".


Hi, so I finally started with a my Nightstalkers helicopter fleet. As they took part in about every campaign since Grenada, they will be very useful for my FoF US Army and Special Forces. I am planning on a MH-6, AH-6j, MH-60K, MH-60L DAP and an CH-47E.
I began working on the smallest of them all: the "Little Birds". I used Tamiya kits, Italeri kits and lots of scratchbuilding to get me two variants. Let's start with the AH-6j (armed) "Little Bird", well known since Hollywood's version of "Blackhawk Down".


AH-6j with M134 Miniguns (7,62mm) and M260 Hydra pods (2.75" FFAR) with seven shots each.


AH-6j side shots reveals details of the scratchbuilt weapons mount and the added details (new tail, FLIR, GPS antenna etc.)


Wednesday, 4 May 2011

HUMINT, May 2011, Vol. 1: new releases for gaming "moderns"

HUMINT = human intelligence. A new series of posts on my blog about news of various tabletop miniature producing companies concerning "moderns". The pictures were taken off the producers' catalogues with their prior permission. Cheers for that guys! Links to their webshops can be found within the right column of my blog (see sources for 20mm....).


TheHobbyDen releases for May 2011:

20mm resin gaming models. Painted by Piers Brand.

Land Rover Snatch


Toyota Hi-Lux

BTR-50


Tuesday, 3 May 2011

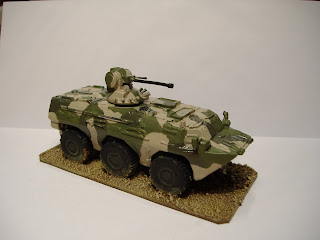
The Dragon Rises: ZSL-92 IFV (Type 92) ready to support the Battle For Skira

Good to be on vacation. You get stuff done, you know :-)

Finally painted up both S&S Models Type 92 (IIRC Shaun calls them WZ551 but that's the chassis only).
Two of the infantry fighting vehicles so far (more to come). Offering space for 9 soldiers and being amphibious as well as armed with a 25mm autocannon and a co-axial 7,62mm MG it adds quite a punch to my Chinese forces. Infantry NCO shown for scale.


Front view: mirrors, wheels and some other details I took from Revell plastic kits. Note the smoke dischargers on the turret front which I added as well.


Back view: The rear lights are taken from a Revell kit, but the resin hull has some to offer as well. Note the tools which I added.


Left side: The decals are from the same sheet I used for the ZTZ99b tank and came off ebay HK.

Note the rust marks I painted on with Vallejo Saddle Brown.


Right side: more tools (Revell) and the towing equipment above. You can see how the powder of Tamiya's weatherin master set was used to "dust" the tires and wheel houes. Before I apply such powders or pigments I normally start drybrushing with brown tones first.


A top view: it reveals the engine grilles and nicely shows the smoke dischargers on the turret as well as its 25mm cannon and co-ax MG. Note the panel lines that were pinwashed with Devlin Mud (GW) - a lot of work that seems to take forever.


Weathering detail shot: You just can't paint the realisic look of actual powders and pigments when you want to achieve a dusty and dirty look. This shot also shows how I used Saddle Brown for rust marks and battlefield damages. Note the exhaust's weathering, solely done with various brown shades of colour.


Exhaust detail shot: sorry for the bad pic, but I guess you get an idea how different shades of brown, applied in a random pattern of dots and lines, will make the metal look like it has been turned hot many times and is now totally rusty. I haven't used matt varnish yet, that's why the dark green is semi-glossy in those pics!

How to paint modern Chinese PLA woodland-camo vehicles

Today I am going to share how I do paint modern PLA armor camouflage for woodland areas. I don't claim my way of painting this is right, nor do I say my colour selection works best (but I took the colour table from a 1/35 kit producer). However, given the amount of questions in different forums it seems like people like my vehicle's look. So here is a quick tutorial on "How to paint modern Chinese PLA woodland-camo vehicles"!

What do you need?

-model (obviously *LOL*)
-Tamiya's Grey Basecoat coloured primer spray
-Vallejo's Model Color Iraqi Sand (70819), Saddle Brown (70940) and USA Uniform (70922),
-Games Workshop's Chaos Black, Boltgun Metal, Chainmail, (Foundation) Mechrite Red, Blood Red, Hawk Turquoise, Enchanted Blue, Blazing Orange, Vomit Brown, Bestial Brown, Graveyard Earth, Scorched Brown and the washes Devlin Mud and Badab Black,
-Tamiya's NATO Black,
-Mr Hobby's H321 Light Brown, H303 Green (=FS 34102), H309 Green (=FS 34079),
-matt varnish spray
-Tamiya's weathering master (set A)
-brushes (sizes 2-3 down to 0)
-"drybrush" brushes (one with flat tip, one with round tip)

Step #1
Assemble the kit and put it on your base (if you prefer to). Use Tamiya's Grey Basecoat primer spray and give it a full coat. Allow the primer to dry completely, then start painting the base with GW Bestial Brown. Drybrush the base with GW Vomit Brown afterwards and add a drybrushed layer of Vallejo's Iraqi Sand on top.
Paint the whole vehicle (apart from tracks or wheels!) with Mr Hobby Light Brown. I normally tend to paint the sides of the bases with GW Graveyard Earth. But that's a personal choice, you don't need to.

Step #2
Time to apply the outlines of the camo pattern. I paint all areas that later will be green (no matter which shade of green) with Mr Hobby H303 Green. These colours do require some thin layers. Don't blotch huge amounts of it at once, rather go with more thin layers!

Step #3
When the first green camo pattern has dried, use Mr Hobby H309 Green (which is slightly darker) and add those blotches of the pattern. At this time you could basicly also start painting the wheels with Tamiya NATO black and paint areas that will get a metal surface with GW Chaos Black, to make sure the metal tone looks alright.


Step #4

Step #4 is by far the longest and takes a tremendous amount of time. First you will have to pinwash around all panel lines and recesses. Use GW Devlin Mud to do so. It will help to break the flat bright brown surfaces and add more realism to your model. Use the Badab Black wash to add dirt to the engine grilles on top of the vehicle.

These washes need some time to dry, so don't paint anything else until they are (otherwise you will touch areas of still wet wash and have your fingerprints all over the model!)

Step #5

The last step requires a lot of paints as we obviously need to paint up all details.
The lenses and windows get a base layer of GW Enchanted Blue. Once dried, add a thin line of GW Hawk Turquoise.

Drybrush the Light Brown areas of the camo pattern with Vallejo Iraqi Sand. Be careful and try not to touch the green areas. For the green edges use Vallejo USA uniform and drybrush them as well.

The tail lights I paint with (Foundation) GW Mechrite Red, followed by a center highlight with Blood Red.

All tools (the metal parts of them) and the towing equipment get a layer of GW Boltgun Metal, followed by a highlight with GW Chainmail. I also use this technique for the headlights. Paint them Boltgun Metal, then add a dot of Chainmail to the center.

The wooden parts of the tools need to be painted in a brown tone. I use GW Graveyard Earth to do so.

The exhaust needs some steps for a rusted look: give it a base layer of GW Bestial Brown, then use Scorched Brown to add random dots and lines (I really mean random!). When you are done, add same again on different spots with Graveyard Earth and Vallejo Saddle Brown - if done correctly the exhaust will look like rusted metal (check the entry of the finished ZSL-92 in my blog for a detail shot).

Paint the gun barrels of the 25mm autocannon and the co-axial MG with GW Chaos Black.

Use Vallejo Saddle Brown to add marks of rust on areas that might got shot at or damaged in previous missions. Don't go crazy with this - you don't want to paint a wreck!

Drybrush the wheel houses and their direct vicinity with GW Scorched Brown, Graveyard Earth and Vomit Brown to add dirt for the weathering (don't forget the lower hull on front and back). You can also softly brush over the tires, but I prefer to use pigments and powders for those.

Last step is adding the powder of the weathering master set (A) from Tamiya. I use the applicator to "paint" them on the flanks of the tires and into the wheel houses. Afterwards the brush side of the tool is used to "dust" all lower hull parts and the road tread of the wheels.


That's it. Take a good look at the ZSL-92 IFV article on my blog. The various shots from there will help you to undestand what paints go where.


Chris

Monday, 2 May 2011

Stylish Blogger Award


Well, first off: thanks, Donogh ( http://donoghmccarthy.blogspot.com/2011/04/stylish-blogger-apparently.html ) for adding me to this.


1. Thank and link back to the person giving you the award.


Done, thanks, Donogh.


2. Share seven things about yourself.


a) The Avatar pic is not me. But I guess you knew that. :-)


b) It shows a TV character that coincidently bears the same first name in that show: Chris.


c) I am not a soldier, yet I am surrounded by many of them (no, I am not in custody) LOL


d) I love Lagavulin. Google it, if you don't know what it is. No, I am not an alcoholic.


e) I am a Metalhead since I was four years old. According to some family members I was dancing to "I wanna be somebody" from W.A.S.P. at that age. \m/


f) Apart from camouflage I don't have anything but black coloured stuff to dress in. No, I am not an Emo. ;-)


g) I cannot stand stupid people and I get annoyed by watching the news easily. :-)


3. Select 10-15 blogs who you think deserve this award.

Phew, that's hard. I mean, I watch many blogs because certain themes in there are of interest to me (while others aren't). Well, I guess I just list 10 of them.


4.- Contact these bloggers and let them know about the award.


Will do. ^^

Thursday, 28 April 2011

Force On Force: new website, new forum design, new Quickstart rules and free stuff

Hi,

just posting to let you guys know about the new website of Ambush Alley Games being online now as well as the forum being re-designed and back up. If you haven't joined yet, now's the perfect time!

Furthermore there are new, free download Quick Start Rules that explain the basic game mechanics, so if you are interested in the game, why don't have a first glimpse at the core rules first? You can find them for free in the right column of this blog or at the new website of AAG.

Shawn and Peggy also have put out a free set of Fog Of War cards, so you can download them and don't have to damage your books. You can find them under "downloads" at the website or you can use my blog (right column).

cheers,
Chris

Tuesday, 26 April 2011

Grubby Tanks and Britannia Miniatures - April 2011 update

On the behalf of Piers, I post this in my blog to let you know about Andy Grubb working hard on getting Britannia Miniatures back into action!

written by Piers Brand » 26 Apr 2011, 12:11


Just spoke to Andy today and he asked me to post a quick update on things as he is very busy!
http://www.grubbytanks.com/catalog/
He has moved alot of the Britannia stuff over to his premises, and moving the 'Monster' that Dave created is taking time. He has a number of ranges that aint seen the light of day for years, let alone even getting things properly sorted. But he hopes to have a few metal ranges back in production over the next couple of weeks, quickly followed by the resin vehicles. Andy really is working full tilt on this, so fair play to him. He is also trying to get the website updated with pictures as well. On top of this, he also has some new releases... Not to mention starting on yet another new range of WW2 figures for Kellys Heroes... Sadly I cant what it is yet, but it will be good!
So, if you are after Britannia stuff, I would suggest dropping him a line and seeing if he either has it in stock or when its liable to get produced. I think he is conscious of the desire for the modern ranges, so they may well get his attention first. But as always, the best option is to drop him a line. Im going to keep The Guild updated as often as Andy feeds me news, (...)
I for one will give him all the support I can over the next few months as I imagine it will be hard work getting everything sorted and running right. He does have some new things coming soon, so hopefully next week I may have some new bits to show off for him!

Cheers,Piers

Sunday, 24 April 2011

The Dragon Rises: PLA Type 99 (ZTZ99B) battle tank adds its firepower to the Battle For Skira

The Type 99, also known as ZTZ99 (...), is a third generation main battle tank (MBT) fielded by the Chinese People's Liberation Army. It is made to compete with other modern tanks. Although not expected to be acquired in large numbers due to its high cost compared to the more economical Type 96, it is currently the most advanced MBT fielded by China. The ZTZ99 MBT is considered one of the 12 best tanks in the world, and is a successor to the Type 98 G tank manufactured for the People's Liberation Army (PLA). (taken from http://tanks.net16.net/ztz99.html )

This resin and metal kit is made by S&S models. I had it sitting on my shelf for nearly 1 1/2 years now and it was about time to finally paint it. If you click the label "PLA" you will even find the post were you can see it raw, without paint (and how long ago that was, too *doh!*)

This shot gives you an idea of the impressive size of China's latest battle tank in ~1/72 scale, the infantry NCO is shown for scale.

Of course the turret spins. :-D
I cannibalised a Revell T-72 for drums, towing cables and the obligatory trunk of a tree. Note the texture on the log.

Front view revealing the additional armour plates of hull and turret frontside.

The small device with the laser warning label is part of an active protection system (APS). The laser-dazzler confuses enemy sights, optics and incoming warheads of ATGMs. The PLA badges and numbers are part of decal sheets I got off Chinese ebay for bargain.

The side view shows the subtle weathering. I was trying to add some mud and dust effects to the trackguards. Some chipping here and there gives it a well-used look.

Rear view. Towing cable and drums and better view of the trunk of a tree that is used to pull the tank out of mud if it got bogged down.

Other side with the commander's hatch and the QJC-88 heavy machine gun (pretty much the same like the Russian DShK).

The top of the tank shows the engine's grilles and the camo nets in the turret stowage bins.

Detailed shot of the turret. Note the optics and laser-dazzler device (APS). Some minor rust marks were painted on various armour panels.

Mud and dirt stains on the trackguards were painted on using a variety of brown colour tones. Paint chipping was done using saddle brown from Vallejo.


Tuesday, 19 April 2011

The Dragon Rises: PLA anti air teams with QW-2 SAM launchers

These shoulder launched QW-2 SAMs are the equivalent of the Russian IGLA or the US Stinger missiles. They are heat-seeking and a real threat to any aircraft or helicopter in low altitudes.

I used the appropriate miniatures from S&S and Elhiem West-Germans to resemble three such teams.

Bases are made from steel washers (30mm), some stones added and little bit of flock and foliage...
The Elhiem minis were converted. The Stinger missile had to be re-designed to bring it closer to the look of the S&S launcher the other miniatures are bearing. I like the fact that both miniatures are having different heights - like real humans, miniatures come in various sizes, too.
One holds a spare missile while his mate scans the sky for any incoming USMC helibourne invasion force to Skira.

The Dragon Rises: PLA spotter team with QBU-88 Marksman Rifle

These S&S models of the PLA range are my forward artillery observer team or could act like a scout team for other purposes. The standing rifleman has a long-ranged QBU-88 rifle with a strong scope. The fuel drum and ammo boxes they hide behind are battlefield accessoires made by Italeri.
I used Tamiya weathering powder to add the rust to the fuel drum and dust to the ammo crates.


The Dragon Rises: PLA weapon team with HJ-8 "Red Arrow" anti-tank guided missile

The HJ-8 "Red Arrow" is a SACLOS (semi-automatic command to line of sight) guided missile in use with the Chinese PLA. I used a modern French MILAN team from RH Liberation to build this little diorama of a tank-hunter team waiting in ambush position.
I wasn't sure about markings used on the launcher tubes, so I went with those that could be seen on vehicle based ATGMs of the PLA during the 2009 Parade in Beijing.
Note the shoulder straps made from Green Stuff.
Both team members received QBZ-95 Assault Rifles made by S&S, which I added to the shoulder straps I made from Green Stuff. Basicly I only did this to make the obvious French-looking miniatures (they are based upon such) look more Chinese army like.

The Dragon Rises: PLA weapon team with QJC-88 HMG

QJC-88 heavy machine gun emplacement. Figures by RH Liberation, based upon an Iraqi DShK team. Sandbags are from Italeri's 1/72 battlefield accessoires.
The loader has received a shoulder strap made from Green Stuff putty and a S&S rifle (QBZ-95)

The team wears Type-87 woodland camo. I tried to paint little red rectangulars, they shall resemble small Chinese flags worn on the shoulders...

Note the assault rifle I added to the loaders' back.